 |
| This is not a DH bike...yet. |
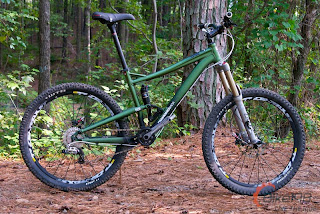
The bike I spend most of my time on is my Diamondback Mission. Most mornings I'll go ride XC at Duthie, Grand Ridge, or Tokul. I love that it can be set up to ride almost anything. I usually have mine set up with a Fox 36 up front, RP23 in back, Crossmax wheels, Hammerschmidt, Saint Brakes, 30.5" Gravity Light bars, and a 50mm Gravity light stem. As a downhill racer, I refer to this as my XC bike. I like to have my bike set up like a mini DH bike. I can pedal it to the top, but still rip corners and hit jumps and hard lines on the way to the bottom.
A few weeks ago, I went and shuttled a local NW riding spot. I was with a friend of mine who had never ridden DH, so I gave him my downhill bike to use and decided to use my
In order to convert my bike to the ultimate mini DH machine, I wanted to change a few things. These would reduce the all mountain ability of the bike, but would make something that would work great for my needs. My wish list went as follows:
1. Slacker head-angle
2. Lower bottom bracket
3. Stiffen the rear end
My initial plans were to run either a shorter eye-to-eye shock and/or offset shock bushings to lower the BB and slacken the head-angle. There wasn't much I could do to stiffen the rear end, but I figured I could build a rear wheel with a bolt on axle that would help a little. A quick side note, when I say I want the rear end stiffer, I'm coming at this after being used to my really stiff DH bike with a 150mm bolt on rear end and am smashing this bike into turns as a pro DH racer whose just shy of 200lbs. I am putting a lot of force into a bike that wasn't intended to be raced downhill. 95% of riders would never notice these flex issues, but this is my dream list. I figured I would try and make it feel more like my DH bike.
 |
| Prototype swing arm on the left, production swing arm on the right |
Diamondback does a lot of testing of frames and parts that will never make it to market. They produce prototype parts for the proof of concept and to just see how various ideas will work in the real world. One of these pieces was a new swing arm for the
 |
| 150 mm thru axle from an old Giant DH Team, cut down to fit the new 142mm rear end. |
I went home and immediately bolted it on my
 |
| I didn't have to remove much material for it to clear the seat tube |
 |
| Apparently I needed to remove more material than I thought. The minor dent in the seat tube. |
Overall though, I was really impressed with the upgrade. The bike feels much stiffer and I'm happy with that. However, the brace hits the seat tube, so that will have to change. I still haven't lowered my bottom bracket or slackened my head angle, so now the next step is to put on a shorter shock. The
 |
| As it sits for now. |
More updates after the next round of modifications. The goal is to be able to race this bike at the 2nd round of the All Gravity Series at Silver Mtn on June 19th.
-KT

No comments:
Post a Comment